Create Oracle OIC REST API using our comprehensive guide. Explore these step-by-step instructions and expert insights on creating robust REST APIs in Oracle OIC, empowering seamless integration between applications and systems for enhanced efficiency and agility in your organization’s digital ecosystem. Below are the general steps to build a REST API endpoint in Oracle OIC.
Sign in to Oracle OIC and Create a new connection
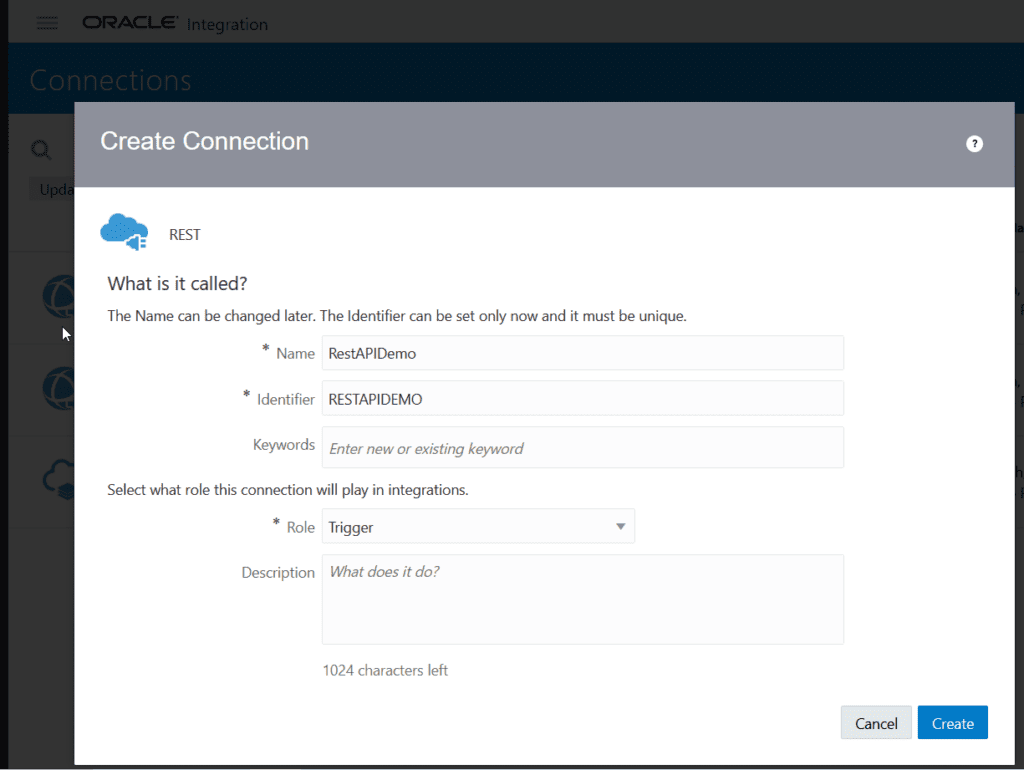
Login to Oracle Integration Cloud console using your credentials. Go to Integrations -> Connections and click Create button and choose REST adapter and fill details as shown below. For more information on REST adapter, refer to link. Click create and choose “Basic Authentication” on next page and test/save you work.

Create a new Integration
As a next step we will now create a integration. Navigate to Integrations in OIC console and click create button and choose APP Driven Orchestration and fill in details as follows and click create. You will land in designer page of integration. Switch layout to Horizontal and choose our previously created connection in start activity.

Configure REST Endpoint in Oracle OIC
On next screen enter end point name and parameter details and check configure this endpoint to receive the response as shown below. Click next

In next step as shown below, we need to set the default data type of parameters. We will leave operator as string and for num1 and num2, change these to integer data type.

Now we will configure response payload. Choose response payload format to JSON Sample and also the media type of response body to JSON. We can provide sample JSON as an inline code. Enter below inline code in yellow highlighted sample JSON inline as in snippet below
{"answer" : 786
}

Here our configuration of end point is complete with summary snippet given below. Click done to return to designer page in OIC.

Design Integration Flow
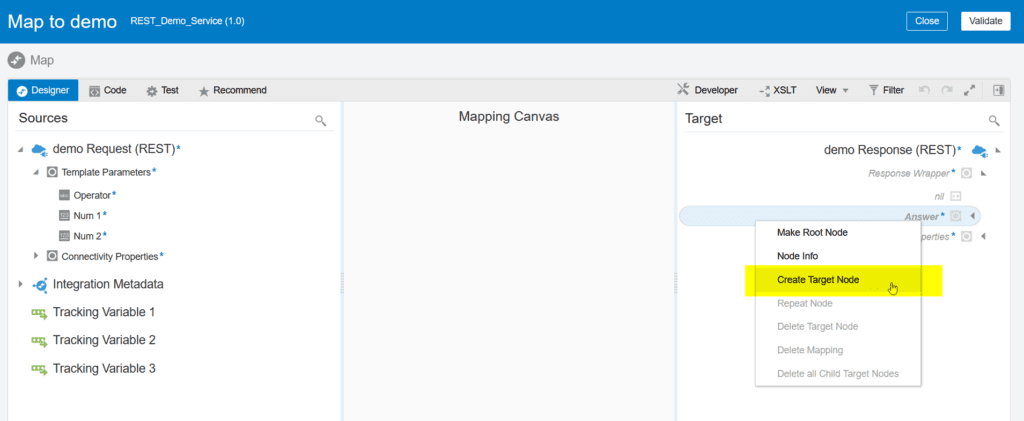
Once the trigger is configured, we can now design the integration flow by adding various activities and transformations. Edit map to demo activity in designer view and create target node under response wrapper as shown below

We will XSLT functions i.e. choose, when and value-of to check if operator is ADD, then add num1 and num2, if it substract then num1 – num2 and if it is divide then num1 / num2 and so on. Mapping sample of add operator is shown below.

Similarly add logic for other operators and click validate in the end. You can also test this XSLT transformation here by using the Test functionality. As required by OIC, we need to choose business for tracking for successfully saving without errors. We can choose all parameters here as tracking and debugging purposes as shown below.

Activate and Test our REST Service Endpoint
Once you are satisfied with the configuration and mapping, its time to activate the integration to make it live. Activate the integration from integration page in OIC console and choose test to test it within OIC environment

You can test this REST service integration from your browser after getting endpoint URL from OIC console. Similarly, we can use postman to test end point providing you have required credentials and that user has access to OIC. In addition, you may need to check your firewall opening in Oracle cloud console before calling this service outside of OIC.