Oracle Fusion ERP (Enterprise Resource Planning) provides the Enterprise Scheduler Service (ESS) for scheduling and managing background jobs. ESS allows users to automate various tasks, such as data imports, integrations, and report generation, improving efficiency and reducing manual effort. In this guide, we’ll explore how to create an ESS job in Oracle Fusion ERP.
We will register the Oracle Business Intelligence Publisher (BIP) report as an ESS Job to run an integration in asynchronous mode. This mode enables us to schedule ESS job to be executed at specific intervals not subject to timeout restriction.
Create Data Model and Layout in BI Publisher
Log in to your Oracle Fusion ERP instance. Navigate to the BI Publisher area under the “Tools” and then “Reports and Analytics” section. Define a data model for the report. Once the data model is created, we will design the layout of your report using BI Publisher’s layout editor. Include fields from the data model and design the appearance of the report. Save both the data model and the report layout in BI Publisher.
Create ESS Job in Oracle Fusion ERP
Go to Setup & Maintenance and search for “Manage Enterprise Scheduler Job definition%” for financials and supply and choose to open as shown below

Click create new job definition. Enter display name and name for the BI report ESS job. For path, we just need to provide folder of the report since Oracle will prefix the standard path i.e. /oracle/apps/ess/custom/. Choose application as Financials Common Modules. Job Application Name would be FscmEss and Job Type would be BIPJobType. For Report ID, we would need to copy complete path of report here. Since we do not have any parameters for this report, we can now save and close. For more information on each field in ESS job creation screen, please visit this link.

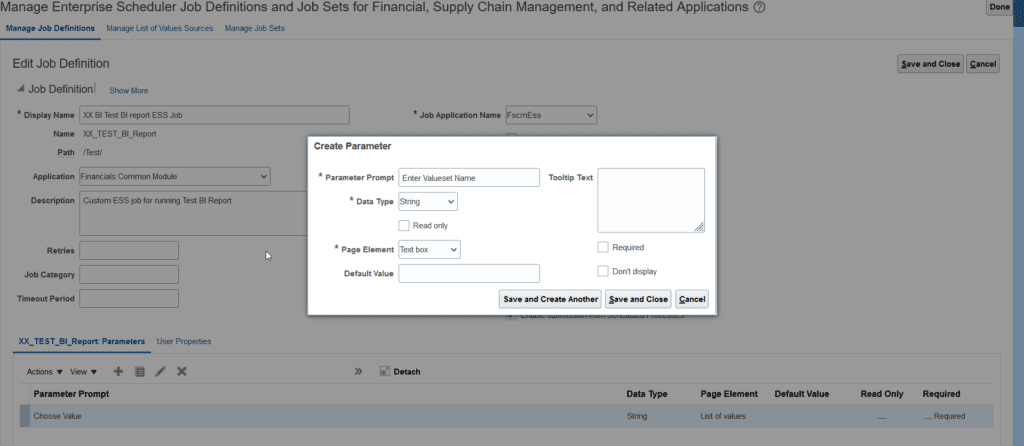
Add Parameters to ESS Job
We will two parameters since our report has 2 parameters. Since one parameter is LOV based, we will define a list of value as shown below.

Attach this LOV as a parameter to custom ESS job as shown below

Add another parameter as a text. Please note the order of parameters is important as the first parameter in ESS job definition will map to first parameter to BIP report and similarly second ess job parameter to second parameter of BIP report.
Submit & Monitor ESS Job
We will submit our newly created custom job and check the output. Go to Tools and scheduled processes and create scheduled process and search and submit the ESS job after specifying the parameters. Click on job after it is successfully completed and in output, choose republish to view its output in default format.
Provide Access to Other Users
This custom job is visible only to the user who has created. In order to make it accessible for other user, we first need to run standard ESS job i.e. Import User and Role Application Security Data. After completion of this standard job, the custom job will start showing up in security console under roles as a privilege. We need to add this privilege to existing role or we can define a custom role and add this privilege under function security policy and assign that role to the user who need access to this custom ESS Job. Run again the ESS job ‘Import User and Role Application Security Data’. Refer to the post for guide on creating a custom role.